
In this tutorial, I will go over how to install and setup my favorite editor: Spacemacs. Spacemacs is a great editor that combines the best of Emacs and Vim. Spacemacs can be configured to be as heavyweight and featured as an IDE, a lightweight text editor, and everything in between. When I first discovered Spacemacs, I struggled to find resources on customization. This post explains why I use Spacemacs as well as provide installation instructions with my configuration on macOS Catalina.
Emacs Vs. Vim
If you work in software, in any capacity, you have probably heard the age old debate about which editor is better: Vim or Emacs. I personally know diehard fans on both sides of the debate. I know Vim users that swear Emacs is dying and out of style, as well as Emacs users that refuse to use an application that doesn’t have some sort of integration with Emacs so they don’t have to leave their precious editor. It may sound as such, but I am not exaggerating how fiercely the two sides bicker about which is better.
I have used Emacs and Vim in my professional work. Honestly, both are great. For me, I love the packages available for Emacs. You can hook in integrations to do just about anything you want from checking and sending email to changing the song playing on your Spotify. Emacs also tends to feel “closer” to the code in the sense that the keybindings I use the most in Emacs pertain to moving around a small section of the code with precision. Emacs also has a significantly lower learning curve then Vim. Anyone who tries to tell you differently has not tried to teach both Emacs and Vim to a budding programmer.
Vim is quite different from Emacs. Vim feels more like flying around on a drove above your code with the ability to drop down onto the surface. Vim is notorious on the internet for the question of “How do I exit Vim?”. Personally, I love Vim for reading a new codebase where I need to visit multiple locations and read code quickly.
Despite not really taking a side here, I think it’s really important that newer programmers learn at least one of this editor’s keybindings. The keybindings are so widely used that almost every single editor supports switching the key-map to Emacs or Vim. For example, if you interview for a job in a place where they give you an online editor (like Facebook) you can switch the editor key map to either Emacs or Vim.
The Alternative: Spacemacs
Spacemacs is an open source editor that combines Emacs and Vim into a single editor. Effectively, Spacemacs is the best of both worlds to me. You can fly around code like Vim and drop into Emacs keybindings at the touch of a button.
Next up, I will give some reasons I use Spacemacs. Because of its configurability, it’s impossible to cover all of it.
Learning Emacs and Vim Keybindings
My biggest reason for loving Spacemacs is that in hybrid editing mode, both Emacs and Vim keybindings are available. Because you can use both, you are able to use whichever parts of Vim and Emacs you like. For me, I love quickly running through files with Vim1 and Emacs for local movement around functions and classes.
Learning both sets of keybindings is very useful as well. If you ever find yourself on a foreign machine (common in HPC), you will never be left without an editor because at least one of Emacs and Vim will be installed. Also, as previously mentioned, many collaborative coding platforms (commonly used in interviews), allow for switching to either Emacs or Vim keybindings.
Compatibility with Other Editors and IDEs
Almost every editor allows for Vim or Emacs keybindings to be used. Many Integrated Development Environments (IDE) like VSCode directly support Emacs and Vim keybindings. VSCode, however, also supports Spacemacs keybindings with VSpaceCode.
Spacemacs keybindings make VSCode my favorite IDE. Accessing the Command Palette with SPC-SPC, window navigation with SPC-<window #>, and previous buffer with SPC-TAB are all huge improvements over the ergonomics of the base keybindings in VSCode.
The keybindings are very easy to install through the VSCode package manager (just search VSpaceCode), however, I recommend getting Spacemacs running locally first for users who are new to Spacemacs.
Use with Iterm2
I develop mostly on Mac and Linux. For Mac, my favorite terminal emulator is Iterm2. Spacemacs runs well inside Iterm2 and outside Iterm as a standalone application. The time to open Spacemacs can be much longer than Emacs or Vim, so I usually have Spacemacs running as a background process that can be entered or exited with fg and CTRL-z.
Org mode
If you don’t know of Org mode, and you’re the obsessive type that loves to track each and every activity/ticket/TODO inside their codebase, this section might change your development life.
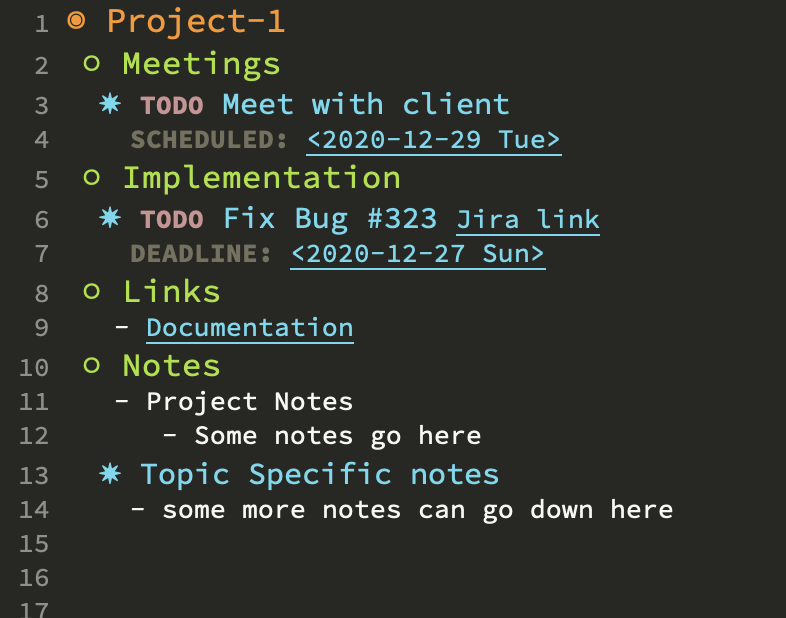
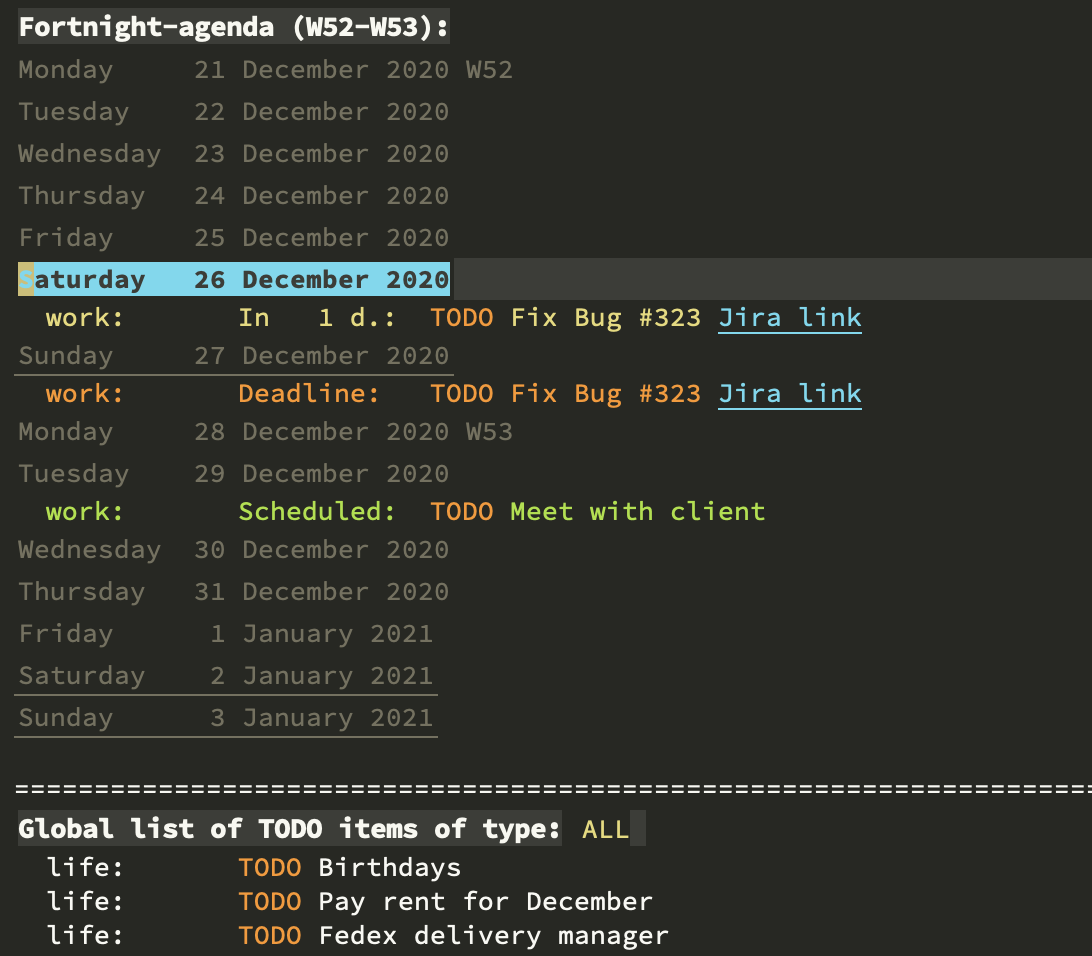
Org mode is essentially a TODO list on steroids. Org mode can be used for writing notes, linking to code (org-capture), TODO lists (org-todo) with priority and scheduling, and much more. In some ways, I use org-mode like JIRA: I have a piece of code I want to re-factor but not in my current Pull-Request, so I do an org-capture which writes the line of code with a TODO message in my org notes for that project. I can then use org-agenda to see all of my TODOs for all my projects as well as any scheduled items.
My favorite feature of Org mode is org-export. One org document can be exported to HMTL, Latex, and even Sphinx (ReadTheDocs) documentation.
Configuration and Installation
Spacemacs is entirely configurable. This customization is both the best and the worst part of Spacemacs. While the framework can be customized to each individual users needs, the editor requires that users be somewhat familiar with how it’s configured in order to use it effectively. This brings me to the real point of this article which is to explain and show how to setup and use Spacemacs. I wanted to write this article as it took me about 2 years to finally get Spacemacs into a configuration I loved.
The following will show how to install, setup, and configure Spacemacs on Mac OS Catalina v10.15.6
First, to installing Spacemacs is fairly easy, however there are some requirements to have installed
Once you have the above requirements installed, you should be able to follow the steps I have outlined in my repository here. If you end up using these steps, please star the repo so that other people can recognize and use it.
I will briefly go over each of these steps in order to explain them in greater detail.
Step 1: Install Emacs
Spacemacs builds on top of the base distribution of Emacs. In fact the .emacs.d folder that is created in your home directory when you first install emacs will be the installation location of Spacemacs.
Here we will install Emacs using brew. Run each of the following commands in order.
brew tap d12frosted/emacs-plus
brew install emacs-plus@28 --with-spacemacs-icon
ln -s /usr/local/opt/emacs-plus@28/Emacs.app /Applications
Step 2: Install Spacemacs
To install Spacemacs, you download the Spacemacs codebase into your .emacs.d created
in your home directory when you installed Emacs above.3
# Create a backup of you emacs configuration
mv \~/.emacs.d \~/.emacs.d.bak

# download the Spacemacs codebase into a folder name `.emacs.d`
git clone https://github.com/syl20bnr/spacemacs \~/.emacs.d

# Get the specific version of Spacemacs we want to run
cd .emacs.d && git fetch origin release-0.200
git checkout release-0.200
Some people may want to use a newer version of spacemacs, but in my experience the release shown above is the most stable/bug-free version I have encountered.
Step 3: Make sure it works
At this point you should be able to use your file explorer to open Spacemacs as it should be linked into your Applications folder.
If it opens successfully, Spacemacs will prompt you a series of questions. Just go ahead and hit enter until it’s done because then you’ll be using the suggested defaults.
This should install some defaults for a while and then eventually bring you to a screen that looks like an editor window.
Step 4: Install my Configuration
This step is completely optional, but I wish this existed when I first got started with Spacemacs.
In this step we will clone my configuration repository and use it to configure Spacemacs
# delete your previous configuration
cd
rm .spacemacs

# Download my configuration
git clone https://github.com/Spartee/spacemacs

# navigate into the directory and setup the configuration
cd spacemacs
mv spacemacs-config \~/.spacemacs

# install some awesome fonts
brew tap homebrew/cask-fonts && brew cask install font-source-code-pro
So now you should be able to close and re-open spacemacs with my configuration. This will delete some packages and download some new packages, but don’t worry about that for now.
The big difference you might notice is that you are now in hybrid editing style. Hybrid
is my favorite because you always start with Vim keybindings, but can drop into Emacs
keybindings by just pressing i .4
Getting to Know the .spacemacs Configuration File
So one of the trickiest parts of Spacemacs is the configuration file. In this section I will outline some of the important configurations and how to change them.
Layers
So the layers in Spacemacs correspond to the “modes” that Spacemacs hops into when you open files of a specific type. For instance, since I love python, you’ll notice that I have the python layer declared in my dotspacemacs-configuration-layers.
Each layer comes with a specific set of keybindings for that layer. For instance, if you
open a Python file in Spacemacs, you can press the keybindings SPC-m. and a buffer will
pop up that shows you some keybindings that are specific to python (like running your
pytest suite from the editor)
To add a new layer, just add the layer name to the list of layers in the .spacemacs
file. For example, I will add the my-favorite-language to my .spacemacs configuration
file below:
dotspacemacs-configuration-layers'(
 my-favorite-language
 yaml
 javascript
 html
 helm
 ;; auto-completion
 better-defaults
 emacs-lisp
 git
 osx
 markdown
 org
 python
 (shell :variables
        shell-default-height 30
        shell-default-position 'bottom)
 ;; spell-checking
 ;; syntax-checking
 ;; version-control
 )
Spacemacs Init
The Spacemacs init has a number of fields that are important for changing how Spacemacs operates. I will list a few of them and try to explain them in my own words.
Set the editing style. There are 3 modes that control the keybindings
- Emacs
- Vim
- Hybrid (my favorite)
;; One of `vim',`emacs' or \`hybrid'.
;; `hybrid' is like`vim' except that \`insert state' is replaced by the
;; `hybrid state' with`emacs' key bindings. The value can also be a list
;; with \`:variables' keyword (similar to layers). Check the editing styles
;; section of the documentation for details on available variables.
;; (default 'vim)
dotspacemacs-editing-style 'hybrid
Set the Font. Simple enough. You should have installed the font below from the instructions above.
;; Default font, or prioritized list of fonts. \`powerline-scale' allows to
;; quickly tweak the mode-line size to make separators look not too crappy.
dotspacemacs-default-font '("Source Code Pro"
                           :size 13
                           :weight normal
                           :width normal
                           :powerline-scale 1.1)
Set the themes you can cycle through with SPC-T-n. I find this super helpful when I am working across languages within a single project and the theme for one language might not be great for another in terms of syntax highlighting.
;; List of themes, the first of the list is loaded when spacemacs starts.
;; Press ~<SPC>~ T n to cycle to the next theme in the list (works great
;; with 2 themes variants, one dark and one light)
dotspacemacs-themes '(monokai
                     spacemacs-dark
                     spacemacs-light)
Here you can manually change the important keybindings for each editing mode. For the most part, I don’t touch this, but if you have a particular key you don’t like hitting often during the day because of some terrible design decision like the virtual escape key on some Mac keyboards, you can change that here.
;; The leader key
dotspacemacs-leader-key "SPC"
;; The key used for Emacs commands (M-x) (after pressing on the leader key).
;; (default "SPC")
dotspacemacs-emacs-command-key "SPC"
;; The key used for Vim Ex commands (default ":")
dotspacemacs-ex-command-key ":"
;; The leader key accessible in `emacs state' and`insert state'
;; (default "M-m")
dotspacemacs-emacs-leader-key "M-m"
;; Major mode leader key is a shortcut key which is the equivalent of
;; pressing `<leader> m`. Set it to `nil` to disable it. (default ",")
dotspacemacs-major-mode-leader-key ","
;; Major mode leader key accessible in `emacs state' and`insert state'.
;; (default "C-M-m")
dotspacemacs-major-mode-emacs-leader-key "C-M-m"
User Init and Config
The sections within the .spacemacs configuration file where you can truly customize spacemacs are within the dotspacemacs/user-init and dotspacemacs/user-config. Both can be used to customize variables and functions that spacemacs uses. However, there are some distinct differences that you should be aware of before starting your configuration journey.
The user-init should only be used for variables that need to be set before packages are loaded. Largely, users can avoid this section unless they want to configure a piece of a layer.
The user-config section can be used for almost anything: defining custom keybindings, adding functionality and settings to certain layers, and much more. If you have some configuration you know you want to change, but you are not sure where to put it, put in user-config
Topics to Come
If you are curious about any of the topics mentioned in the article or the ones listed below, please comment and I’ll push it to the top of the TODO stack.
- Setting up VsCode to act like Spacemacs
- Org-mode ( in-detail )
- Tramp
Wrapping Up
I hope this article helped you either discover Spacemacs, setup Spacemacs, or both. I think it’s one of the best editors out there, but sadly it’s overlooked often because of the lack of resources that are out there on it compared to other editors.
Thanks for reading!
-
I use Vim keybindings
G-GandShift-Gfor navigating to the top and bottom of files,/for search, andShift-{Shift-}for hoping from function to function. ↩ -
Brew is a package manager for Mac. It’s pretty great. If you have a Mac and haven’t used it before, I highly recommend getting familiar with it. ↩
-
If Spacemacs isn’t to your liking and you want to go back to Emacs, just delete this directory and rename the
emacs.d.bakbackup toemacs.d. After this your original emacs will be re-installed. ↩ -
For Vim folks, hybrid mode essentially turns your
INSERTmode into Emacs. ↩
Comments